Internship Spotlight: Sierra 🎥

Hello! My name is Sierra and I've been an intern at WMSI for about two months. In the time that I've been here I have sat in on lessons being taught, created my own lesson, made a project that can be used by students, and so much more. 

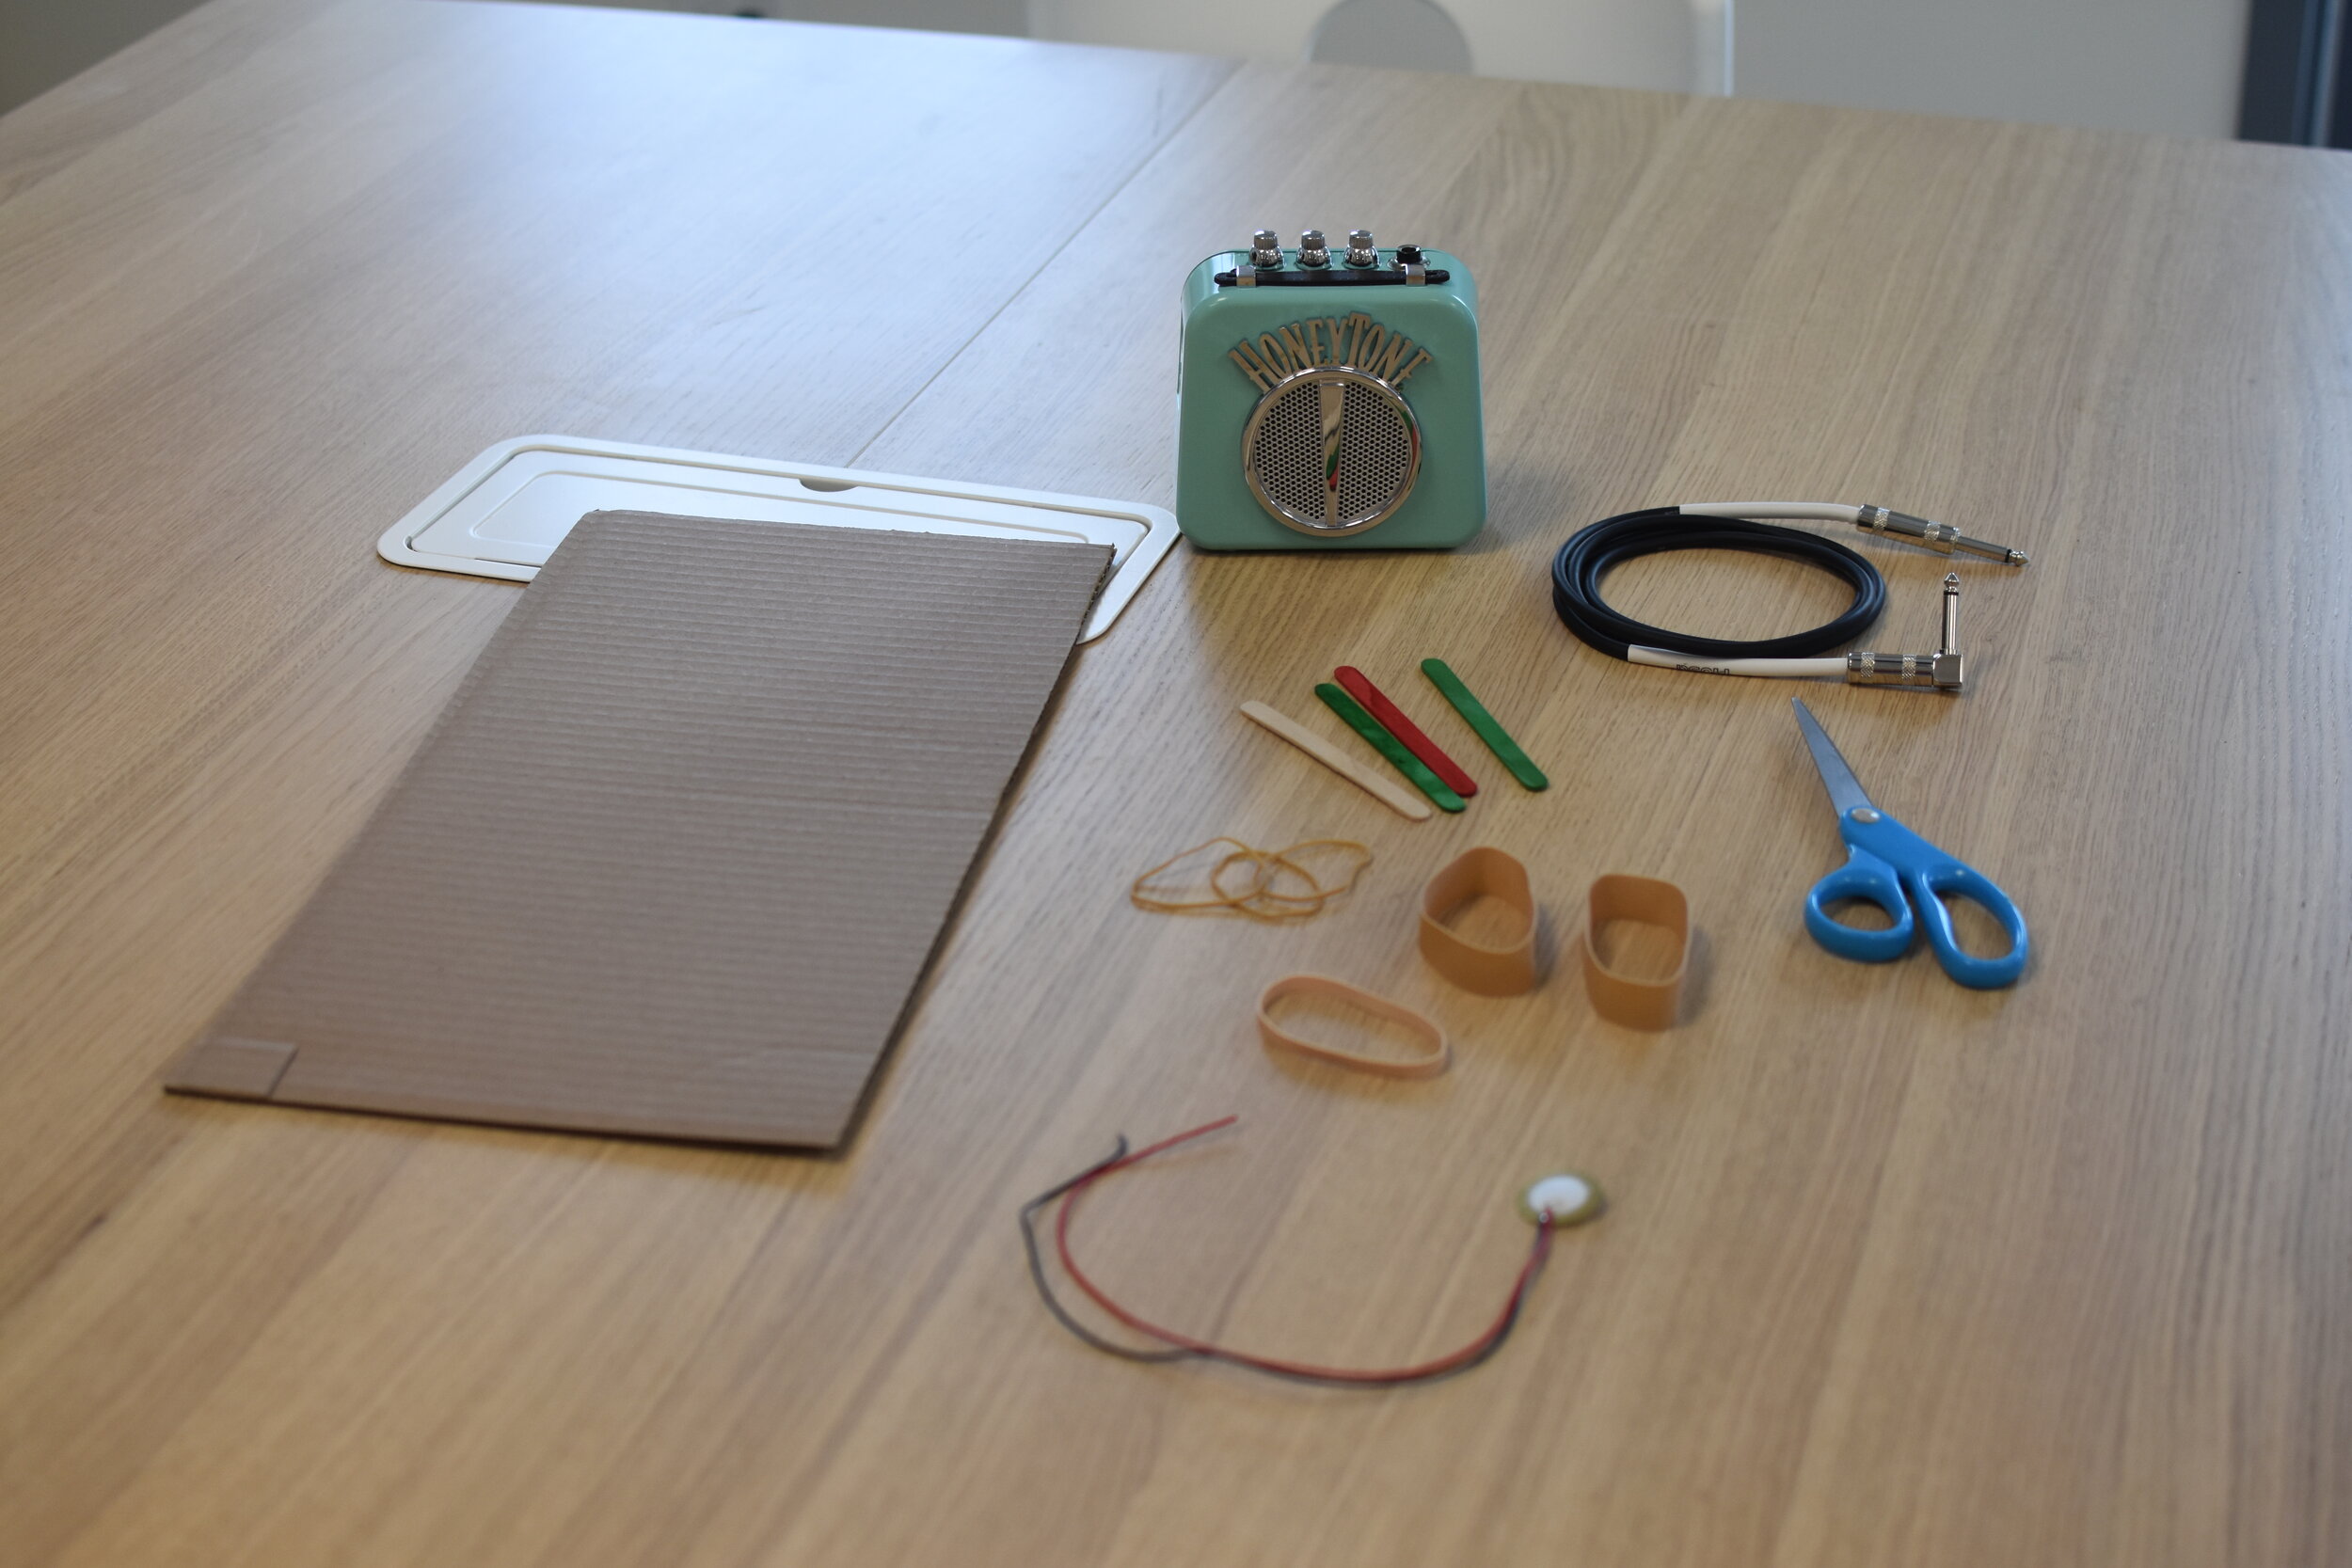
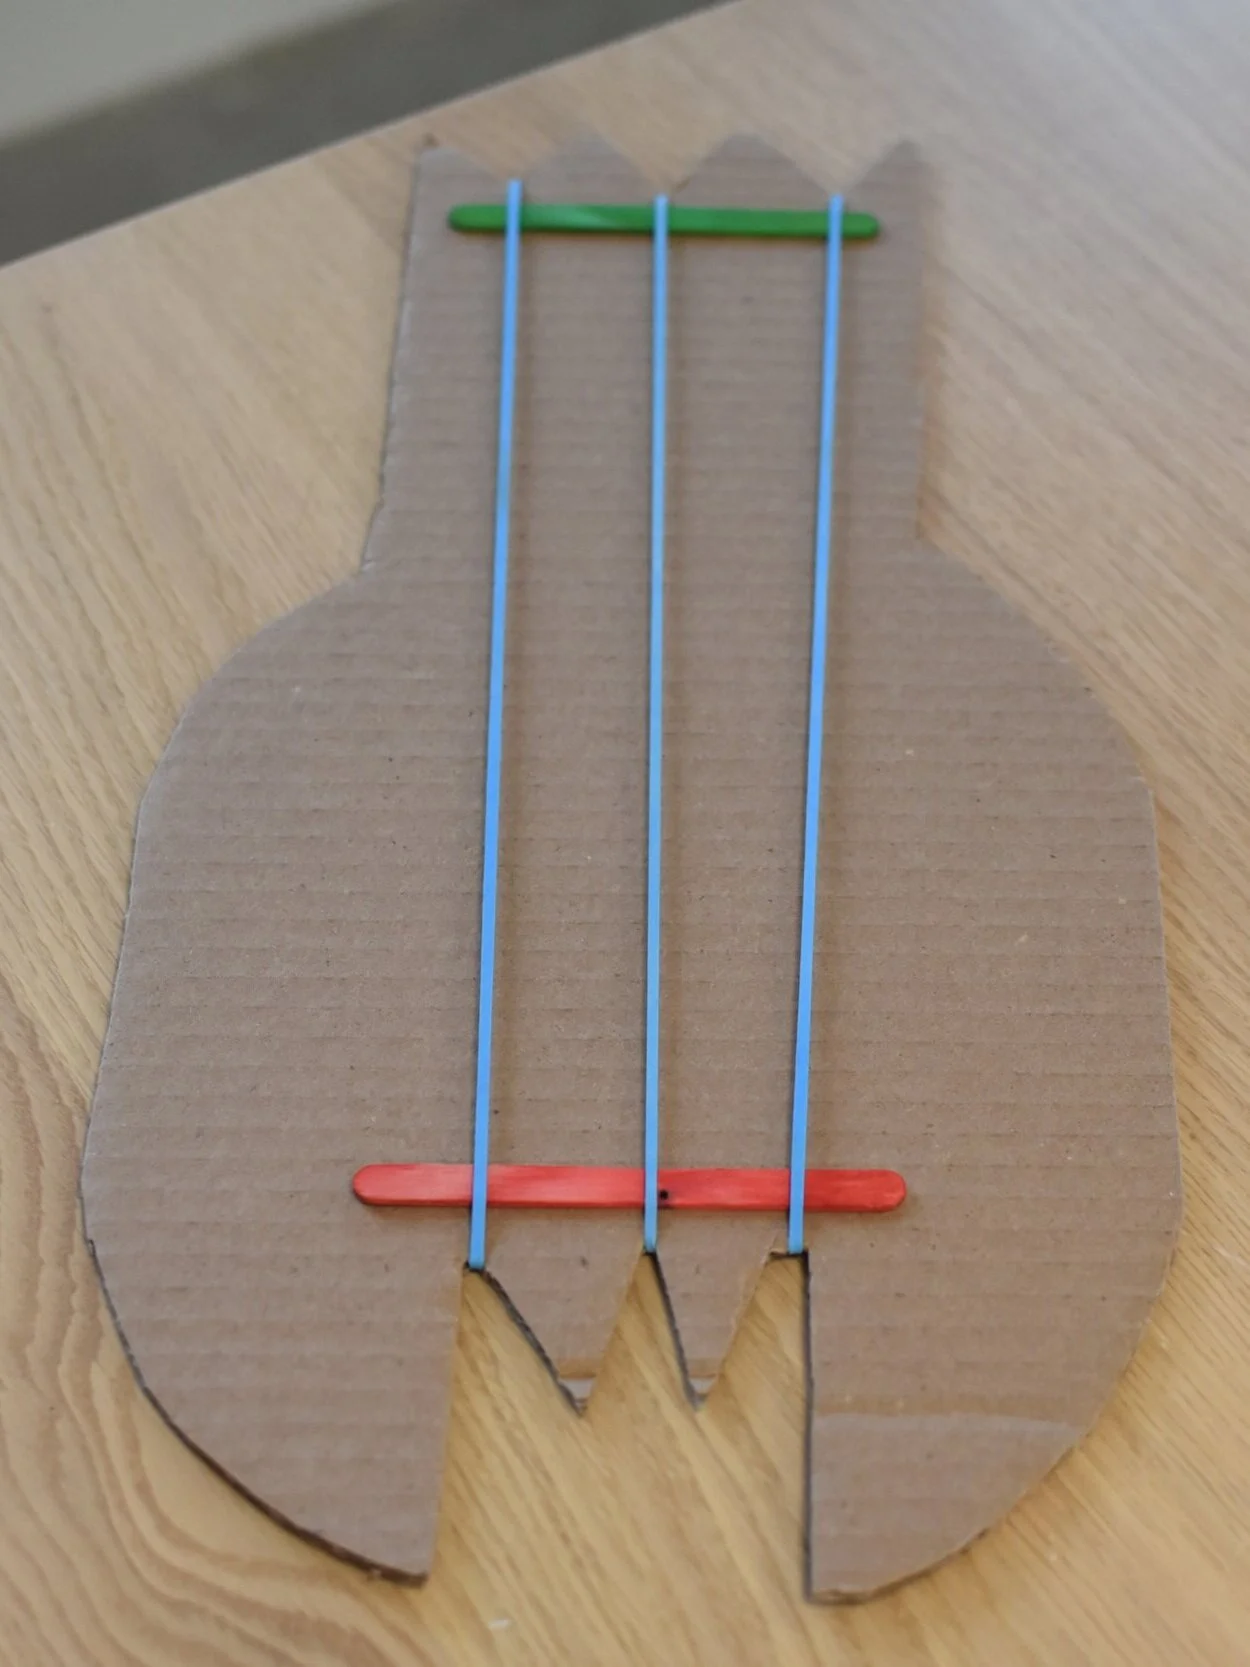
This project was created to help students learn new ways to make cardboard sturdy and easier to use. The only things that were needed to build this were cardboard, tape, glue, and a marker. It was a super easy and fun way to help out around the makerspace.

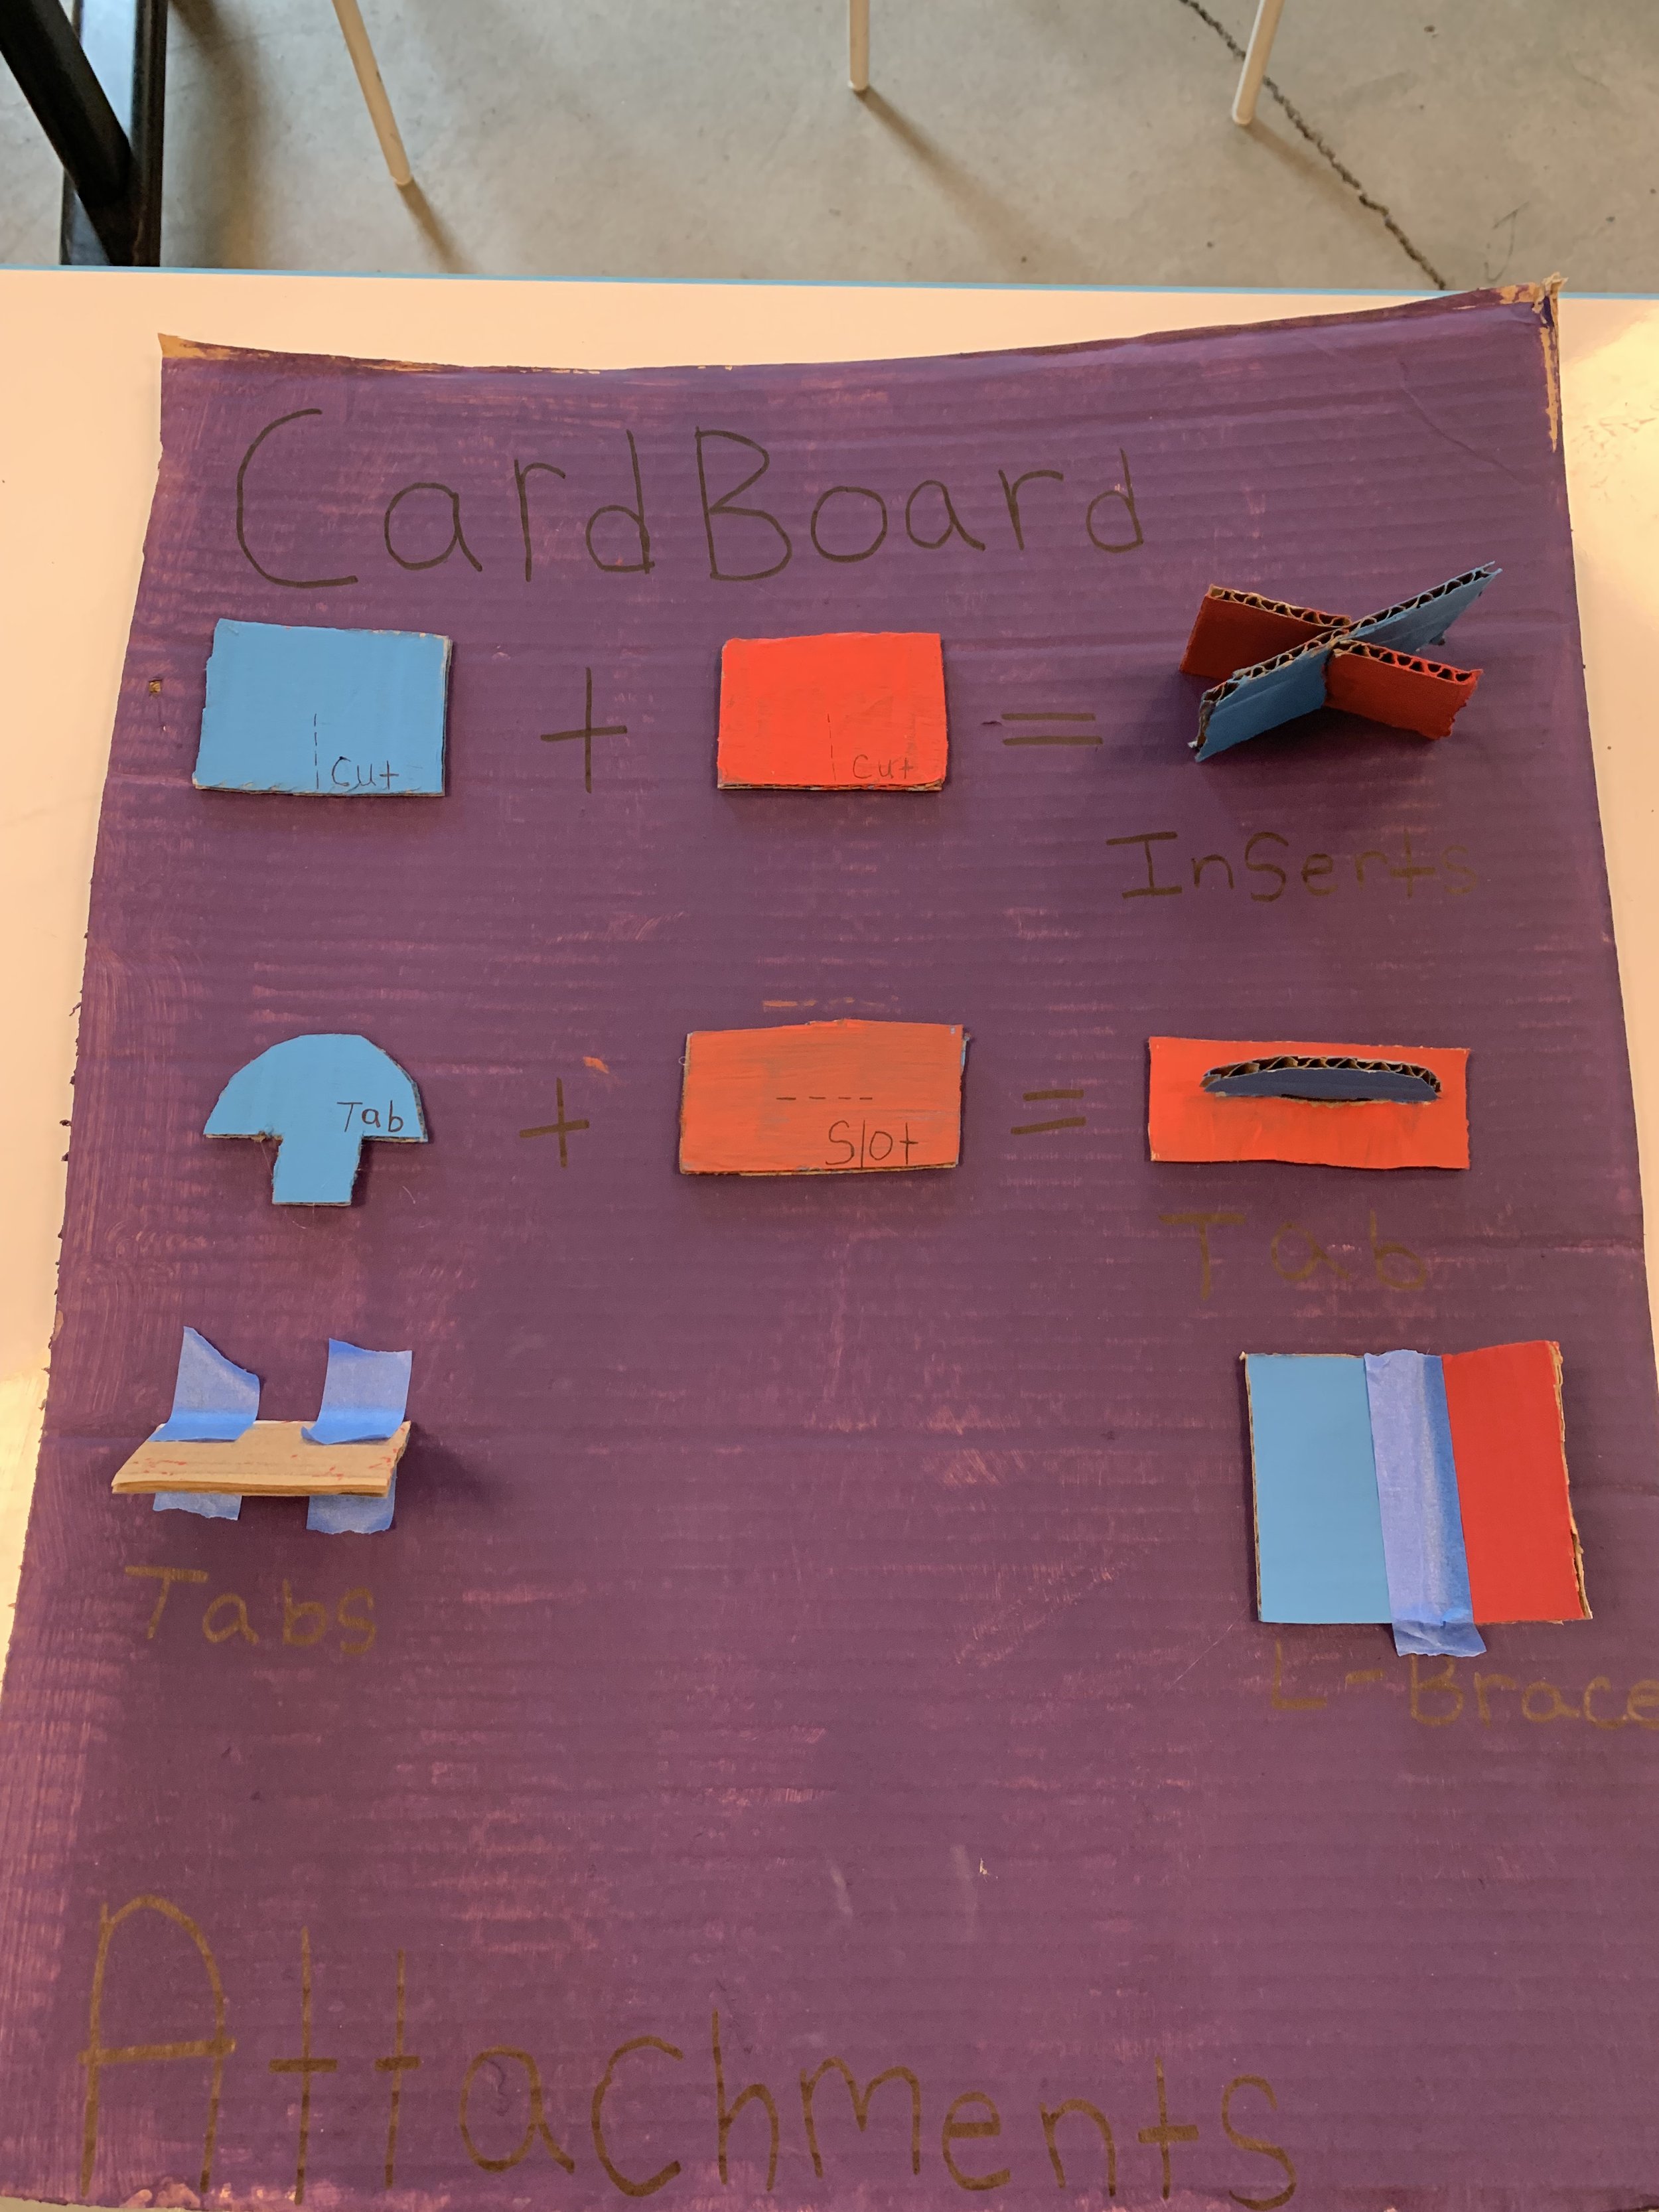
This project was created to help students learn new ways to make cardboard sturdy and easier to use!

The best part of this learning process for me was that I had the chance to create my own lesson. The lesson focused on teaching students about stop motion animation. I was with another instructor that I leaned on for help. She mainly ran the lesson while I gave ideas and shared my thoughts. This was a really big learning curve for me as I have been looking into teaching. WMSI has made this the best experience it could possibly be and I am excited to see where this takes me. 

 I have learned a lot from my time here at WMSI. Not only have I learned hard skills like work ethic, but I've learned a ton of soft skills as well. This is a community filled with kind motivational people and it was a great experience to be able to have. This helped me tremendously in all ways. I have grown personally but also learned a lot about professional work spaces. It has made me realize what I really need to work on, but also skills that I didn't know I had. This is a creative work space and everyone just comes together as a small family and that's where I feel the motivation comes from. 

Although I haven’t been here long enough to show a bunch of projects I do really appreciate the time that I was given to accomplish personal and academic goals. This is a healthy environment to grow and learn. I will hopefully be able to take what WMSI had given me and shown me to my next work place. 

Internship Spotlight: Coltrane & LEGO Education SPIKE Prime!

Hello! My name is Coltrane and I’m an instructor here at WMSI. In the past I’ve worked with several STEM tools such as Scratch, EV3, and Micro:bit, and I’ve made lesson plans and other materials for them. The one I’ve worked with the most is Scratch, which is a website that makes it easier for kids to code through a system of connecting blocks together instead of having to type out lines of code. In the case of Scratch, I’ve created a number of “1 Page Guides” which explain how Scratch works and are tutorials of sorts, walking people through how to create small games and programs in Scratch and teaching them how to create their own programs in the process. I even combined a bunch of them into a Scratch handbook that went over almost everything Scratch-related.

Over the past couple months I’ve been working with a new piece of hardware called LEGO Education SPIKE Prime. SPIKE Prime is the next generation of EV3, and works pretty similarly to an EV3 but with a new coat of paint and a very different coding interface, along with a handful of new features and improvements. When I first started working with SPIKE Prime it wasn’t too hard for me to start coding with the program, as it uses practically the same interface as Scratch, but the motors and sensors that the SPIKE Prime uses weren’t so easy to effectively utilize.

One of the 1 page guides I made was The Safe Cracking Game: it shows how to use a motor with a wheel and how to develop a code that allowed the user to sense the position of the wheel, similar to a safe.

One of the 1 page guides I made was The Safe Cracking Game: it shows how to use a motor with a wheel and how to develop a code that allowed the user to sense the position of the wheel, similar to a safe.

I did a lot of experimenting with the different sensors and unique code blocks that SPIKE Prime had to offer, and I made some of the previously mentioned 1 page guides explaining things as I experimented with them and learned how to use them effectively. I built a bunch of different SPIKE bots and cars, and tried to use each one to further my understanding of a certain topic in SPIKE. For instance, one of the builds that I made was a car with two motorized wheels and a third motor to move a distance sensor and a color sensor up and down. I made some programs that used the color and distance sensor for different purposes, like making the robot do different things when it sensed different colors (pictured below).

spike car.jpeg

While I’ve learned a lot about SPIKE Prime so far, I still plan to continue using it and continue learning about all the different ways that the hardware and software can be used to make fun and educational programs and robots. I might even use what I’ve learned to create a handbook similar to the one I created for Scratch as an introductory tool to help more people get invested in SPIKE Prime in the same way I did.

Sprke prime bot.jpeg

WMSI Interns continue to creatively solve problems remotely this school year.

Internship Spotlight: Joe’s 3D Printed Marble Run

The step by step process on how my marble run was made!

By Joe Woodson

I was inspired to create a marble run for the WMSI maker space after I saw some of the amazing marble runs that are located at The Montshire Museum of Science.

montshire.png

While the marble runs like the one shown in the picture above are made with metal, the pieces for the marble run that I have created were made by using a 3D printer. Plastic wax was melted through a nozzle and a step by step code was used to print the individual pieces out. Magnets are used to hold the pieces onto the board which form the actual marble run.

Most marble runs are enclosed in a glass case so people won't be able to mess around with the inner parts that could be easily damaged, but my marble run is kid/young inventor friendly. The main purpose of this marble run was to have it be interactive for kids so they would be able to move the pieces around to different spots on the magnet board themselves rather than having them look at one big constant loop. Since the individual pieces are made of hard plastic, they are almost impossible to break, making them perfect for kids to play and experiment with.

How the pieces were printed

The codes for all of the individual pieces were created on an online website called Tinkercad. On this website you can create all sorts of different types of designs and objects by only using basic shapes like cubes, cylinders, pyramids, and many more! 

Once the pieces were completed, they were all placed into a measuring system called Cura that shrank them down to the size of the bed of the 3D printer. After the codes were then placed into a small removable drive, the removable drive was then placed into the 3D printer and all that was left to do was to set the printer up and wait a couple of hours for the pieces to finish printing.  

joe 3d.png

The Backboard

The base for the marble run is made of a standard strip of wooden peg board. The original plan for the marble run was to have small pegs stick into the individual pieces and have all of them line up in the peg board holes to form the actual structure the marble will roll down. Unfortunately there were some problems with how the pieces lined up on the board. The marble continuously fell off of the pieces and dropped to the floor. The whole structure was not very strong, so I eventually decided to change the whole design of the marble run from wooden, to magnetic.  


The Magnetic Wall

I replaced the wooden peg board wall with two large magnetic boards and took all of the individual pieces and hot - glued small magnets onto them.

backboard.png
magnet.png

The magnetic system is much better than the old wooden peg board system. All of the pieces fit to the board much better now, and it is a much smoother running for all of the marbles.

The Elevator

The marble run is equipped with an elevator made out of LEGO Technic pieces that carries the marbles to the top of the run and drops them onto the first piece. Since the marble run was created for it to be played with by small hands, the elevator is operated by a pulley system that kids can operate themselves rather than having a motor turning the gears for them. The elevator’s skeleton is made with LEGO Technic beams and a variety of small gears. The chain holding the marble is made up of LEGO treads and the prongs holding the marbles are also made up of pieces from the LEGO Technic set. 

At the bottom of the marble run, there is a bin that holds all of the pieces that are not being used. The bin also contains a hole at the bottom so that when the marbles fall into the bin, they roll through the hole and into the Scoop.The Scoop at the bottom of the marble run is where the marbles are loaded onto the pulley system where they are brought to the top.

elevator.png

This 3D Printed Marble Run took a very large amount of time to create and a large amount of imagination too. Made up and held together with just plastic wax, wood, LEGO pieces, and a good amount of glue!

marble run .png

Listed below are the websites that were used to create the marble run pieces. If whoever may be reading this likes the idea of 3D printing, you can click on the link below to start designing your own creations! 

Tinkercad:  https://www.tinkercad.com/ 

Cura: https://ultimaker.com/software/ultimaker-cura

WMSI Interns continue to creatively solve problems remotely this school year.

WMSi Electric Rubber Band Instruments

Recently I was working on a lesson plan for electric guitars made out of rubber bands and cardboard.

Now at first that may sound strange, how can you make a guitar out of cardboard?
Well I’ll describe the process I went through.

I started the project by rounding up the materials I guessed that I’d need.
I gathered up cardboard, rubber bands, pencils or popsicle sticks, an aux cord, an amp, alligator clips, and a piezo.

DSC_0464.JPG
 

My first prototype was nothing more than a cardboard square with the rubber bands wrapped around it, but unless the rubber bands were lifted up off the cardboard a small amount they weren’t going to make much noise at all.

I added a popsicle stick on each end of the cardboard underneath the strings. Now the rubber band guitar could actually be played and the pencils helped it make a more acoustic sound.

DSC_0468.JPG
 

Next I added a piezo to the back of the guitar under the strings. A piezo is a small device that picks up changes in pressure, acceleration, temperature, strain, or force and converts it into an electric signal. In this project I’m using it to pick up the vibrations of the cardboard, but it has many other uses outside of this.

Next I hooked up one alligator clip to each of the piezo’s wires, made sure that they were holding the wires tight so they didn’t come loose later, and attached the other ends of the alligator clips to the aux cord.

Then I hooked up the aux cord to the amplifier and there it was! A working electric guitar made out of cardboard and rubber bands. When the rubber band guitar was strummed the sound would be played through the amplifier!

DSC_0474.JPG
 

But that wasn’t the end of it just yet. So far at that point I had only made a rubber band guitar out of a square of cardboard, but what other shapes would work?

I started by taking a square of cardboard and cutting out a large square in one of its sides, then I wrapped the rubber bands around the piece of cardboard so that they went over the hole I cut.
To my surprise the hole in the cardboard didn’t seem to negatively affect the instrument at all!

Next I tested whether other materials would work for the instrument. I used  a piece of wood instead of cardboard for the base and it made the sound much clearer!

DSC_0479.JPG
 

I tried using straws and popsicle sticks instead of pencils for the instrument and found that while popsicle sticks and pencils make similar noise quality the straws seem to dampen the noise somewhat, possibly because they’re hollow.

To finish my project I wanted to experiment with how crazy I could make the design of the instrument, as I had previously only made the instruments as simple squares and rectangles, so I tried making more possibly guitar-shaped designs for the cardboard bodies of the instruments.

DSC_0483.jpg

The first experimental design I made had two straws on each side with a hole in the middle, this was the instrument I used to test if the hole in the middle affected the sound, as well.

 
DSC_0489.jpg

The second one I made looks a bit like a pineapple. The 3 little notches on the top and bottom are to hold the strings in place while it’s being played.

 
DSC_0491.jpg

The next and final one I made is the strangest of all. It has 4 strings that go diagonally down the body of the instrument. The strings are held in place at the top of the instrument by 4 notches, but one of the strings at the bottom was held in a small hole in the cardboard.


With that I finished creating the Electric Rubber Band Instruments lesson plan.
I hope you enjoyed reading about my process of experimentation and iteration!